Last class I ran into a bit of a problem when I put the camera as a child of the sphere. It caused the camera to rotate because the sphere was rotating too.
So, I can't make the camera a child of the sphere. Time to try something else: a script.
This script allows the camera to move relative to the sphere's position, and not its rotation. However, I still need to set a target for the camera to follow.
Now that this is done, it should work as planned.
Next class I will be setting up the play area and making the boxes to be picked up by the player.
Tuesday, February 14, 2017
Day 8: Troubleshooting and Moving Camera
So the problem last class was that the ball wouldn't move when I tested the game. The script was correct and attached to the ball, and the proper controls were assigned, so that wasn't the problem. Apparently, it was a simple setting in the inspector that was messing it up; I had speed set to 0.
Problem solved, time to continue.
To make the camera move with the ball, I simply dragged the camera to the sphere (player) to make the camera a 'child' of the sphere. This forces the camera to move same distance as the sphere,
Problem solved, time to continue.
To make the camera move with the ball, I simply dragged the camera to the sphere (player) to make the camera a 'child' of the sphere. This forces the camera to move same distance as the sphere,
And apparently it also follows the orientation of the sphere...
Next class I will figure out how to stop that.
Wednesday, February 8, 2017
Day 7: Making a Minigame - controls
To add physics to the player object, I needed to add a component to the sphere called "RigidBody". This allows the object to interact an collide with other objects.
To make it move, the sphere needed a script. First, I made a folder named "scripts" where I would put the aforementioned script. Then, with the sphere selected, I clicked "add component" in the inspector window, "new script", and named it "PlayerController". I then clicked "create and add" to attach it to the sphere.
Now to edit the script. To open the editor, I clicked the gear icon on the script component, and then clicked "edit script". This opened a script editor, in which I pasted the script that allows the ball to move.

Unfortunately, it doesn't seem to be working. Tomorrow I plan to fix that though.
Day 6: Making a Minigame - Setup
Now that I understand the basics of Unity, I'm starting a tutorial-guided minigame.
So, I started by making the playing field. This was done by going to "game object>3D object" and clicking "plane".
The "player" was then made by going to "game object>3D object" and clicking "sphere".
Next, I had to colour the playing surface. First, I created a new material in a folder named "materials". Then, in the inspector, I clicked the colour box next to "albedo" and selected the colour I wanted.
My next post will be about adding the ability to move the character (sphere).
Friday, February 3, 2017
Day 5: Build/Player Settings and the Profiler
First off, the Build and Player Settings. A "build" is an exported/executable form of a project, which differs for each platform. For PC, Unity exports an executable version of the project, whereas for the other platforms, it exports various files.
The build settings work with the player settings to define settings for the build that you create.
These are basic settings such as what icon the game is shown as, resolution, and what platform the project is being made for.
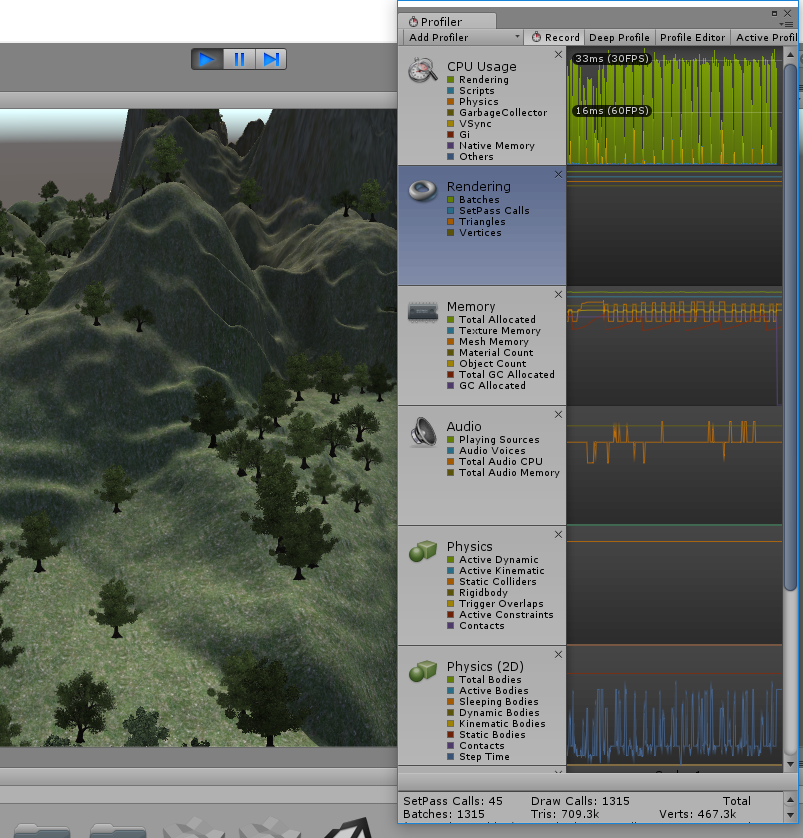
Next, the Profiler. The Profiler is used to assess the performance of the game. To open it, press ctrl+7. The Profiler activates when the "play" button is pressed, and stops when it is stopped. It shows statistics such as cpu usage, memory, rendering, physics, and more.
So, now that I've learned the basics of how to navigate and use the settings and basic controls, next class I will start with one of the game-making tutorials.
Thursday, February 2, 2017
Day 4: Terrain
First I started with finding the option to create a blank terrain object. It wasn't too hard, really.
Now for the more difficult part: Finding a terrain generator that's free. Most of the decent user-made assets cost money. $1-5 for some decent assets, up to $200 for extremely high-quality assets. There are, however, some that are free. So begins my quest to find a generator, and textures (and maybe some shaders).
Now, armed with these, let's see what I can do.
...
The only asset I ended up using were a few textures and WorldBuilder. Everything else was just built-in tools in Unity.
Tomorrow I'll probably continue with the interface/navigation tutorials.
Now for the more difficult part: Finding a terrain generator that's free. Most of the decent user-made assets cost money. $1-5 for some decent assets, up to $200 for extremely high-quality assets. There are, however, some that are free. So begins my quest to find a generator, and textures (and maybe some shaders).
Now, armed with these, let's see what I can do.
...
The only asset I ended up using were a few textures and WorldBuilder. Everything else was just built-in tools in Unity.
Tomorrow I'll probably continue with the interface/navigation tutorials.
Day 3: Project Panel and the Inspector
Today I learned about the Project Panel: the place where all the assets for the scene/game are located.
I can import new assets by clicking the 'Assets' button at the top of the window, and clicking 'import New Asset'.
I also learned about the Inspector panel. This is where the selected object's properties and scripting can be edited. Components can be added to make the object behave in a certain way.
Tomorrow, I plan to take a break from the tutorials and figure out how to use different terrain generators and other environment tools.
Subscribe to:
Posts (Atom)